

Hands-On Geology: Make a Cave

* This post may contain affiliate links or sponsored content. *
My boys love rocks and dirt, so I always try to create hands-on geology opportunities. Recently we visited a real amethyst mine in Ontario, Canada. Not one of those roadside water wheels where you grab a tray and wash fake gems for $20, but a real – no kidding – hole-in-the-ground amethyst mine. The boys took real hammers and chisels and safety goggles to dig out our own purple keepers.
Not planning on a homeschool field trip to Canada any time soon? You can turn any geology lesson into a fun hands-on activity by making your own cave. Not a “man cave”, but a little space to get creative and enjoy learning about geology.
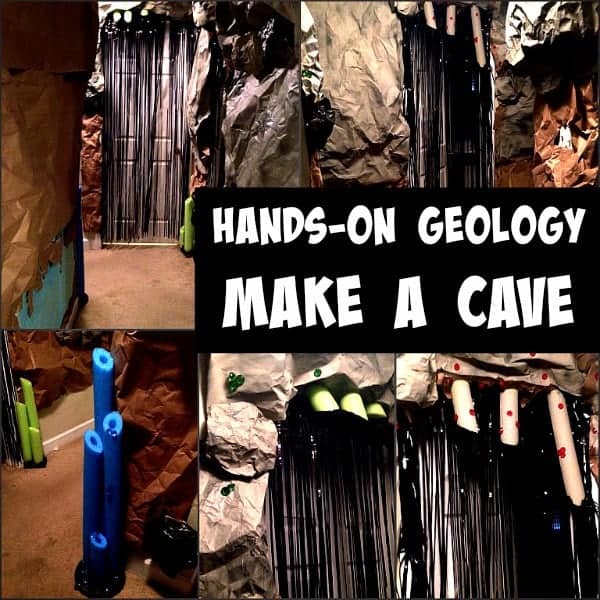
Hands-On Geology Make A Cave
Cave Supplies:
- Carpenter Paper – I grabbed a roll at Lowes (this can be used later for full body sketches for anatomy lessons, or giant map making opportunities later in the year!)
- gray paint – check the “oops paint” section first
- large scotch tape
- small brown paper bags – lunch bags
- washable tempera paint – any color for cave paintings
optional:
- dark gray spray paint
- pool noodle for stalactites and stalagmites
- round foam craft pieces for the base of stalactites and stalagmites
- craft gems to glue to pool noodles
- hot glue
Step One: Decide how crazy you want to get with this cave and find a location you can keep everything up for a few days (or two months because you just can’t bear to take it all down).
I picked the hallway between the boys’ bedrooms, mostly because it would not be a complete eyesore. I will never do an entire hallway ever again. I highly recommend one wall or corner!
Step Two: Measure your wall so you can easily cut the correct amount of carpenter’s paper. Otherwise, you may or may not make 17 extra trips up and down a ladder to fill the space, curse under your breath that hands-on activities are killing you, and swear you’d rather just send your children to public school.
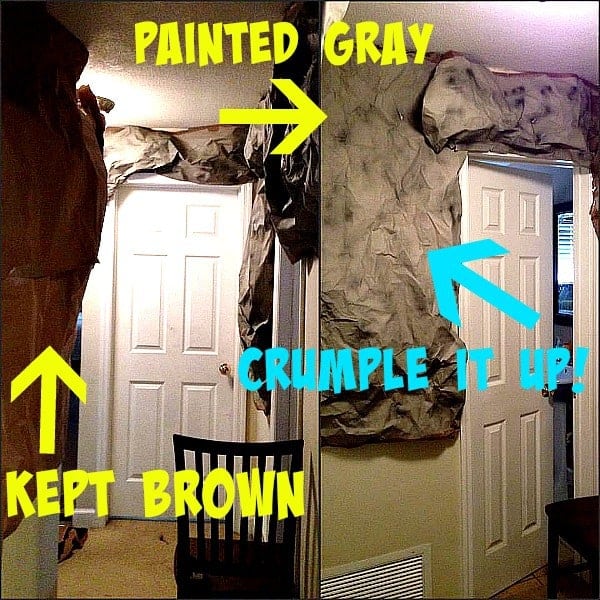
Step Three: If you want gray “rock” walls, paint the brown paper gray. Add a few spray paint spots if you want some 3D detail. Let it dry! Once dry, crumple it all up like you’re going to throw it away. If you don’t mind a brown cave wall, just crumple the paper up. We did both.
Unravel the paper back into sheets and then hang it up on the wall. (I just taped the top of the paper to the wall and then tried to make some air pockets before taping the bottom. I wanted more of a 3D look) I will admit that my “step three” took me two days because I did not measure my space.
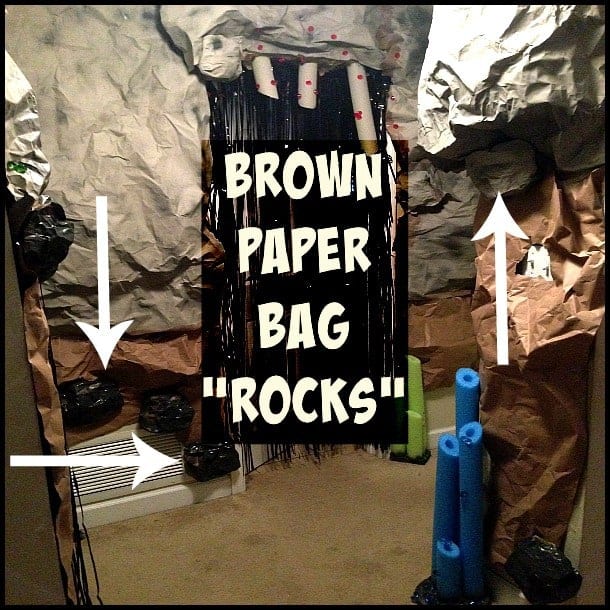
Step Four: Paint brown lunch bags gray or spray paint dark gray. Once dry stuff them with plastic bags or newspaper. Tape the tops and shape into large boulders. Hot glue these bags to your cave walls for more details or cover up empty spots.
I managed to finish the majority of the cave while the boys were out of the house. So their first impression was of complete amazement. They had no idea what to expect. Of course, my oldest didn’t care we were having geology lessons. He told his friends that I made him a Bat Cave.
Stalactites and Stalagmites
These were a bit tricky, and I had to search for ideas on Pinterest. I combined a few things into something I could 1) afford and 2) do myself.
Also, I figured I would just flip the stalagmites and tape to the ceiling, but it didn’t work. I had to hot glue the pool noodles individually to the carpenter’s paper to make stalactites.
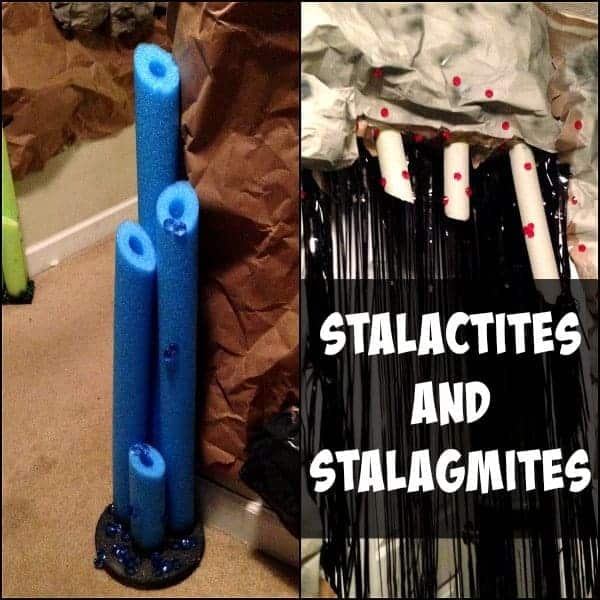
Step One: Cut pool noodles at an angle and all different sizes.
Step Two: Paint the round white foam craft piece then hot glue the straight edges of the pool noodles to the foam.
Step Three: Hot glue craft gems around the base and pool noodles.
I will point out that I went just a tad bit overboard ordering the black doorway decorations. I thought it would make the cave look “cooler” and hide the stark white bedroom and bathroom doors. I DO NOT RECOMMEND IT.
The boys thought it was hilarious to run through them at full speed grabbing handfuls. Every morning I was picking up strands.
Once the cave was finished and I could raise my arms over my head again, we painted the brown paper walls with different Cave Art. We studied Lascaux as we finger painted fun little animal scenes onto the brown walls.
Looking for more geology activities? Read: 10 Ways to Start a Rock Collection
 Stef Layton started homeschooling her boys in 2008. She teaches two hands-on learners. Living in central Florida, the Laytons enjoy water sports, golf, tennis, and good bbq. Stef is the Hands-On Learning Columnist for Homeschooling Today magazine. She also shares hands-on activities on YouTube.
This article was written by a Weird, Unsocialized Homeschoolers guest author. See the author's full bio in the body of the post.
I saw these pictures on Instagram…this looks awesome! I wish I were that creative. 🙂 It reminds me of our church VBS last month. They did CaveQuest, and several parts of our church were decorated entirely like caves. They used some sort of spray foam for the stalactites and stalagmites. I think they did the same thing as you with the walls. I’m going to have to try this when we get to our geology unit. I just hope my youngest who’s 3 doesn’t rip the paper off the walls!