How to Make an Edible Cell Model
Equipment
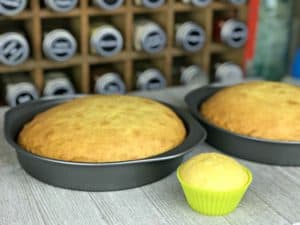
- Round cake pans like these
- Silicon cup cake molds. I used these.
- Round Toothpicks. Any will do, we used these.
- Labels for labeling the organelles. We used these.
Materials
Ingredients for an Edible Cell Model
- Cake mix (and the ingredients to make it.)
- Vanilla icing
- Food coloring
- Various candies to represent organelles
Suggested Candy for an Edible Cell Model
- Blue Mike and Ikes = mitochondria
- Pink Mike and Ikes = smooth endoplasmic reticulum
- Air Head Bites = vacuoles
- Air Heads Xtremes = rough endoplasmic reticulum
- Sour gummy worms = Golgi apparatus
- Candy disc sprinkles = ribosomes
- Cupcake = nucleus
Instructions
Step 1
- Bake the cake mix according to package directions. We used round cake pans since we were doing an animal cell model. We also used a little of the batter to make one cupcake to represent the nucleus. Allow the cakes to cool completely, then, assemble as normal with some of the icing between the two layers.
STEP 2
- Use food coloring to tint the icing so that you have one color to represent the cytoplasm, a second to represent the cell membrane, and a third to represent the nucleus.
- Pro Tip: Start with white frosting and use colors that mix easily to form new colors. That way, you don't have to divide icing and guesstimate how much you'll need for each cell part.
- Add a few drops of food coloring to the vanilla frosting and mix well to create the cytoplasm. Frost only the top of the cake.
- Next, add a few drops of food coloring (using a different color) to tint the icing a different shade (green pictured). Frost only the sides of the cake with the second color. This color represents the cell membrane.
- Finally, add a few more drops of food coloring to the remaining icing to create a third color to represent the nucleus. We chose to add red, which created a rather unappetizing color. Just something to think about.
- Cut the top off the cupcake. Place it on the top of the cake to represent the nucleus and frost it with the third color.
- You can discard the bottom of the cupcake if you choose. However, I recommend that you put a little leftover icing on it and eat it while your kids aren’t looking!
STEP 3
- Place the candies on the cake to represent the cell’s organelles. As we placed each candy on the cake, we reviewed the job of the organelles.(See the quick reference sheet below.)
STEP 4
- Use the toothpicks and labels to make flags. Write the name of each organelle on individual labels. Either fold the labels over around a toothpick so that the front sticks to the back or use a second label, placing it back to back with the first.
- As your kids add the labels to correctly identify each of the organelle, review the organelle and its job again.
STEP 5
- Take lots of pictures…then, eat your yummy cell cake!
Notes
Quick Reference Sheet for Organelle Candies and Their Roles
Pink Mike and Ikes = smooth endoplasmic reticulum. This is where the lipids that form the cell membrane are made.
Blue Mike and Ikes = mitochondria. These are the powerhouses of the cell, where energy is created.
Candy disc sprinkles = ribosomes. They create the proteins that are used in the cell.
AirHeads Xtremes = rough endoplasmic reticulum. These are the “conveyor belts” that take the protein created by the ribosomes to the Golgi apparatus.
Sour gummy worms = Golgi apparatus. This is where the simple proteins are assembled into more complex proteins.
AirHeads Bites = vacuoles. These are the storage closets of the cell, where supplies and waste are stored.
Icing Color #1 = cytoplasm, the jelly-like substance inside the cell.
Icing Color #2 = cell membrane, the part of the cell that encloses and protects it.
Cupcake/Icing Color #3 = nucleus, where the cell’s DNA resides.