

How to Build a Model of a Roman Road

* This post may contain affiliate links or sponsored content. *
In our study of Ancient Rome, Josh and Megan enjoyed learning how to build a model of a Roman road. Brianna was in charge of the salt dough map, so I let Josh and Megan take charge of the road model.
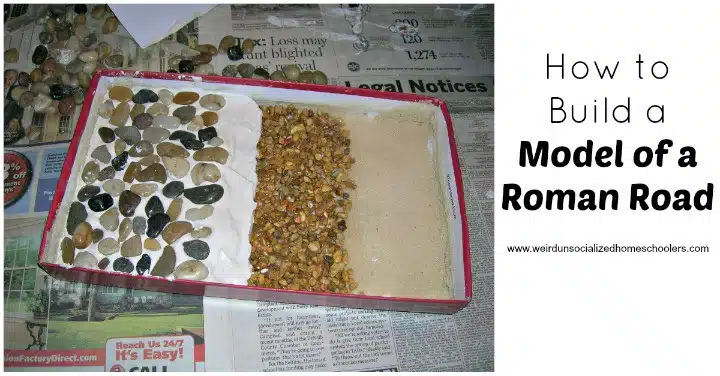
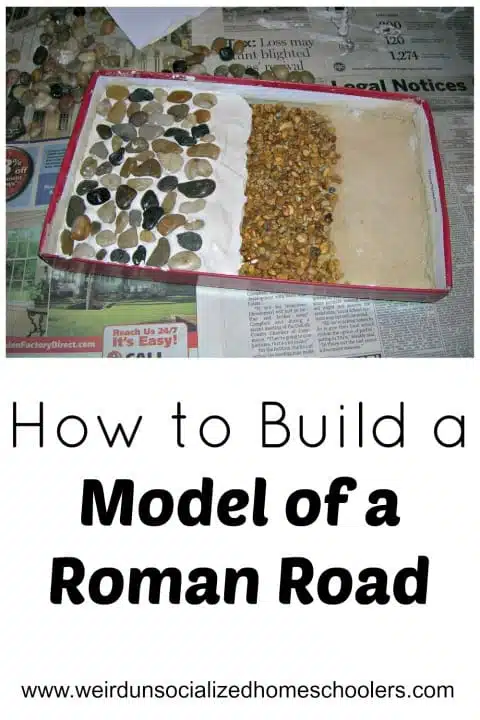
To build a road, the Ancient Romans first dug a ditch. Then, they filled the ditch with sand, followed by a layer of gravel. On top of the gravel came a layer of concrete, which they made from volcanic ash. They made the final layer of smooth stones. Many of these roads are still around today.
Items needed to build a Roman road model:
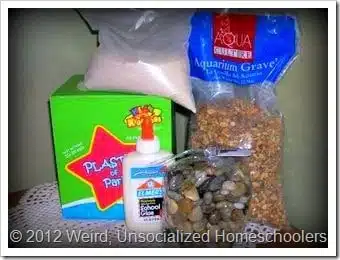
- shoe box lid
- glue or Mod Podge
- sand
- aquarium gravel
- plaster of Paris
- smooth stones
How to Build a Model of a Roman Road:
Step 1: You’ll make the model by making each layer a little shorter than the last so that each is visible in the finished product. First, mix water with Elmer’s glue to make a “paintable” glue. (Mod Podge could be substituted here.) Spread the glue all over the inside bottom of the shoe box lid. Then, spread a layer of sand over the glue and let it dry for about 30 minutes.

Step 2: Shake off the excess sand, Then, paint glue over 3/4 of the sand. Spread the gravel (we used gravel sold for fish tanks) over the glue. Next, pour the watered down glue over the top of the gravel to hold it in place. Let this layer dry overnight.

Step 3: Use plaster of Paris to represent the concrete. Mix according to package directions. Cover half of the sand and gravel with the plaster.

Step 4: While the plaster is still soft, add “paving stones.” Ours were decorative stones from the craft/candle section of Wal-mart. If I had it to do over again, I would have bought larger, smoother stones and I would have let the plaster set just a bit longer. (Also, I think the kids should have put the rocks closer together, but I was trying to leave them alone and let this be their project.)

The finished project turned out great. It gave Josh and Megan a better understanding of how the Romans constructed roads, and they were very proud to have something that they made themselves to display as part of our study of Ancient Rome.
This article was written by Kris Bales–the previous owner of Weird, Unsocialized Homeschoolers.
Kris Bales is a newly-retired homeschool mom and the quirky, Christ-following, painfully honest founder (and former owner) of Weird, Unsocialized Homeschoolers. She has a pretty serious addiction to sweet tea and Words with Friends. Kris and her husband of over 30 years are parents to three amazing homeschool grads. They share their home with three dogs, two cats, a ball python, a bearded dragon, and seven birds.
Can I just say that your blog is getting cooler and cooler… (do they even say “cool” these days?) well anyway… I like it, and I especially like the left handed side bar. Sweet! (There is a more updated word for ya!)
This looks like so much fun!! How neat!
LOVE this, Kris. Great idea!
This road really looks to childish , I was looking for a more realistic road. Could’ve been much much better.
I’m sorry that you were expecting something more sophisticated from a 6- and 8-year-old. I hope you find what you were looking for.
I just wanted to say that this is exactly what I was looking for! I found you through a Tapestry of Grace link. I love the simplicity of this project. I don’t feel that it’s childish at all…it taught your children about Roman roads. Mission accomplished! what’s even better is that they did it themselves (kudos to you for not “taking over” the project). Thanks for sharing.
Thank you, Jenn.
This is exactly what I needed. Thank you for posting.
Thank you for posting this! I could not understand the directions in the Activity Book! LOL
Hands on activities like these make learning fun! I love this! I’m doing this with my kids tomorrow!
I found this exactly what I was looking for. My 7 yr old had to do an ancient Rome road for a history project and this was perfect. Thank you.
I’m glad it helped!