

How to Make a Paper Mache Earth

* This post may contain affiliate links or sponsored content. *
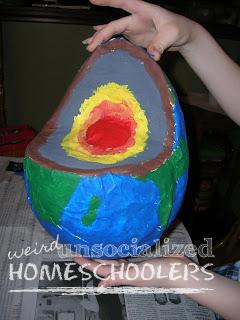
We had a lot of fun making our paper mache Earth model. We decided to do a cut-away version to show Earth’s layers. I was pleasantly surprised that it turned out just like I had in mind with the slight exception of the fact that I couldn’t find any round balloons, so it wasn’t perfectly round. It made a great, hands-on science project to which I think we’ll refer back frequently as we go through Christian Kids Explore Earth and Space this year.

Supplies needed to make a paper mache Earth model
- a balloon
- Sharpie marker
- newspaper, torn into strips about 1-inch wide
- flour
- salt
- water
- paints
How to make a paper mache Earth model
Step 1: Inflate balloon and, if you’re making a cut-away model, mark off the cut-away area. I drew an area covering about a fourth of the balloon for the cut-away portion.

Step 2: Make the paper mache paste by mixing flour, about a tablespoon of salt (to help prevent mold) and enough water to make a thick paste with a consistency similar to glue. I didn’t give an exact measurement for the flour because we didn’t really measure it. I’d say the first couple of layers, in which we covered most of the balloon, took about a cup of flour. Subsequent layers over the “cut-away” part only took a quarter to a half-cup.
**I did discover that any extra can be stored in the refrigerator for a day or so. I just had to stir it up and add a bit more water the next time we used it.
Step 3: Cover all of the balloon except the cut-away portion with strips of newspaper dipped in the mache paste. Make sure to make the strips lining the cut-away portion as square as possible. Let dry overnight, or until thoroughly dry, and add a second layer.

Step 4: Once you have at least two layers of dry paper mache covering the balloon, burst the balloon and remove it from the paper mache shell.

Step 5: Cover the cut away portion of the paper mache shell by layering newspaper strips as tautly as possible over the open portion. Keep everything as taut and square as possible and try to make a defined line separating the top and bottom halves. Let dry overnight and add a second layer.

You may want to wad up a small ball of dry newspaper for the Earth’s core. If so, do this when you add the second layer. Cover this with a couple of layers of newspaper dipped in the paper mache paste and let dry.
Step 6: Once the layers are completely dry, draw the circles marking the Earth’s layers (we only did the standard four, even though our text listed five) and draw out the continents, being sure to leave some of them cut off for the cut-away part.
For Earth’s layers, I drew a circle around the lump we made for the core. Then, I drew four lines off from that, sectioning the center into fourths. I then drew arcs (think: rainbows), connecting them at the lines to achieve even layers. Those who are more artistic than I am can probably skip this step. 😉

Step 7: Paint the layers, the continents and the oceans. We used acrylic paint. You may want to let the paint dry a bit between “layers,” so that the colors don’t run together. Then, enjoy your masterpiece!
**As a mostly unrelated note, I’m sure people wonder, so, in the interest of full disclosure, those beautifully manicured nails are not mine. They belong to my thirteen-year-old daughter. Mine are short, stubby, brittle little things that break at the drop of a hat. Yes, they are her natural nails and, yes, I am slightly jealous.
This article was written by Kris Bales–the previous owner of Weird, Unsocialized Homeschoolers.
Kris Bales is a newly-retired homeschool mom and the quirky, Christ-following, painfully honest founder (and former owner) of Weird, Unsocialized Homeschoolers. She has a pretty serious addiction to sweet tea and Words with Friends. Kris and her husband of over 30 years are parents to three amazing homeschool grads. They share their home with three dogs, two cats, a ball python, a bearded dragon, and seven birds.
That looks fantastic! Paper mache is a lot of fun – messy as all get out, but lots of fun! 🙂
It *is* messy. After the first day of spreading out tons of newspaper and still getting the paste everywhere, I came up with the brilliant (in my mind! lol) idea to move the whole operation to the sink. That worked great. We put the model in the sink with the paste on the counter right beside it. This made much less mess, or at least a more contained mess, and made clean-up much easier.
Kris, you are my hero. that is awesome!
I will have to remember this when we do earth and space. 😉
I have to say when you posted this picture the other day, I was seriously jealous of those beautiful nails. Now, to know that a teenager puts my stubby, uneven nails to shame; just makes me want to cry. Loved the project though, thanks for posting the instructions, my boys 14 and 12 will love this.
Christi
LOL Chrisi. I know the feeling. Believe me, I do. 😉 I think nice nails must have skipped two generations because my grandmother had them, too. Mine are awful!
Terrific post, there is nothing better than a 3D lesson. Thanks for the easy instructions!
This is fabulous and it felt like I was looking into my own home. I love projects like this and we have neverthought to make a moel of the earth like this. What a great idea!
Blessings,
Cheryl
I happened over while blog-surfing the other day and have already added you to my reader :-). My 10-y/o & I just did a model of earth's layers, only we made ours out of homemade playdough. I think making the dough was as much fun as making the model.
What a fun way to discover the layers of the earth!!! You did a great job, but I am so glad that you did not find a round balloon! Although the earth is not pear shaped, it is an elliptical shape. Bravo on getting more science into your day! Have you seen the AWESOME science experiments on this website? https://www.stevespanglerscience.com/experiments/
wow! That is brilliant! Great job!
I also love it…I wanted to say that if you want to ever do something similar, but more round, a cheap beach ball or similar would work in place of a balloon Thanks for the great idea!
Doing this today. Thanks!!!!
I'm going to start today! It's due Friday!
Wow this looks amazing! It really gave me great marks on my project 🙂 thanks so much!
Disqus generic email templateapprove
WOW i have an earth project the deadline and this helped….i did it like i follow the steps but when i made a mark of the cutaway portion i made square i did same thing in the other side is it ok..and when I have to burst the balloon do i have to burst it can i use push pin to pop it? sorry for asking too much and also can u paint it with white paint after all done like completely dry and ready. THis is my first time making science earth model project its so mess i wish there was a video but thinks for the head start i Appreciated.
When you makre the portion for the cutaway, basically, you're making off 1/4 of the circle — think of it as if you'd be cutting an apple halfway down from the top, then halfway across from the side, to cut 1/4 of a piece. It doesn't really matter how you pop the balloon, once the paper mache is dry. You can paint it however you like when you're finished.
Hope that helps.
It's hard
I'm sorry that you found the project difficult. My daughter and I really enjoyed it.
Thank You very much ;D I am from Poland and I go to the your idea by google translate.
That's great, Alex! I'm glad you were able to use the idea.
a good idea but the balloon u used was not really round…..
Neither is the Earth. 😉
Thanks so much for this! I have been doing Sonlight Science with my 6 and 5 yo and the first topic is all about EARTH!!! LOVE!!!
THANKS A LOT!!!! I had to do a 3D model of earth for my 7th grade gifted science class and this helped me.
Thanks again.
You’re welcome. I’m glad it helped!
how do we do step 5
The instructions for Step 5 are explained in the text. If you have a specific question, I will try to help, but the post lists each step with an explanation of how it was accomplished. Leaving multiple duplicate comments just gets your comment marked as spam.
My 8 year old granddaughter has a TAG project coming up. She wanted to make a model showing the layers of the earth and of course came to Grandma. She suggested a small styrofoam ball and I asked her if she would rather make a larger one out of paper mache. Of course she wanted to do it that way. Wish I had looked this up before we did it. We paper mached the whole balloon, but think we will be able to cut away the portion we do not need.
Nice post!!
Thanks,
Jan
Thanks, Jan. Hope the project turns out great!
It was a great idea. I used a plastic soft ball instead of balloon and got a perfect round shape.
Thank You.
this helped so much!! im doing this but for the layers of the sun!!!
Thank you for the GREAT idea, the fact that he could put it together in 1 day, was icing on the cake!!!!!! My son did have to use the hair dryer for hours to dry it but that’s what happens when you forget!!!!!
I’m glad I could help! 🙂