

Step-by-Step: Making a Paper Mache Map

* This post may contain affiliate links or sponsored content. *
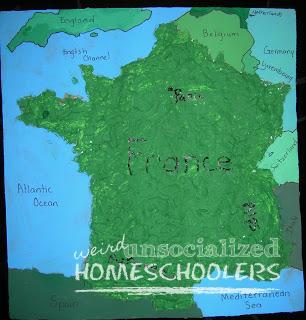
For the last several years, the kids and I have made salt dough maps for the countries we study for our homeschool group’s Around the World Day. Last year, one of the families in our group had made a paper mache map from a kit they’d purchased. We decided we’d try our hand at that this year, winging it as far as how-to’s. We thought it turned out pretty good.
Supplies for making a paper mache map
- shredded paper
- heavy, flat piece of cardboard (we usually use pizza boxes)
- water
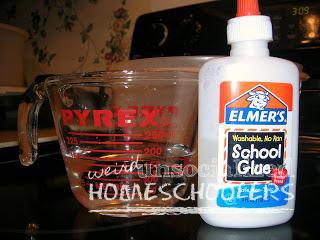
- glue
- enlarged map of country (we like 11X17)
- paint (acrylic works best)
How to make a paper mache map
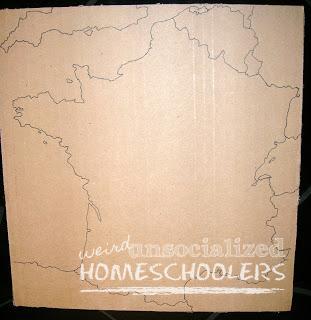
Step 1: Trace you country map onto the heavy cardboard (see salt dough map post for more detail on how we do this step):
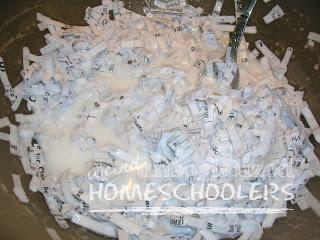
Step 2: Mix glue (we used most of a bottle of Elmer’s) and enough water to make a soupy paste. Add in enough paper to complete your project. We used paper from our shredder and added several large handfuls.
If I had it to do over again, I think I would have mixed the paper and enough water to make it moist in the blender first, to make a sort of “paper pulp” or let the paper sit in the glue/water mixture long enough to absorb some of it and get a little mushy. I think it would have made shaping it easier.

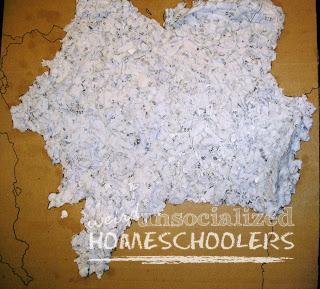
Step 3: Shape the paper mache into the country outline, being sure to build up mountainous areas. Allow to dry thoroughly (ours took 2 or 3 days to dry completely).
Step 4: Paint paper mache portion of map. Use paint or colored pencils to fill in surrounding countries and waterways (optional) and use a Sharpie to label points of interest. (Prior to painting with acrylic, we put a layer of Kilz on the paper mache portion of our map to keep it from soaking up so much paint.)
I hope this is an activity that you and your family will enjoy. We’ve always found that making maps really helps us to get a much better understanding of geography when we’re doing country studies.
This article was written by Kris Bales, the previous owner of Weird, Unsocialized Homeschoolers.
Kris Bales is a newly-retired homeschool mom and the quirky, Christ-following, painfully honest founder (and former owner) of Weird, Unsocialized Homeschoolers. She has a pretty serious addiction to sweet tea and Words with Friends. Kris and her husband of over 30 years are parents to three amazing homeschool grads. They share their home with three dogs, two cats, a ball python, a bearded dragon, and seven birds.
Looks like fun! I've never tried paper mache with glue, only flower/water mixture ~ we'll have to give the glue a try sometime! 🙂
Kris,
THanks for sharing…I loved your map and we may try it, thanks to your tutorial!
C~
Oh how fantastic! Finally, use for the paper from our shredder!!! I love this, and we're going to try it. Thanks Chris!
This is a great idea Kris. Tapestry of Grace suggests making a lot of maps out of salt dough and cookie dough. But the paper mache is one I haven't heard of. I've got to remember to try it.
http://www.homeschoolblogger.com/kristenph
Great Idea.Thanks for sharing it.
thanks for the tutorial it is really good and helpful thanks for sharing your idea
The glue and water mixture didn’t work too well. I prefer the flour/water mixture better!