


How to Make an Edible Cell Model Your Kids Will Remember

Learn how to make an edible cell model, using cake and candies, that looks as incredible as it tastes.
Making a cell model of some sort seems to be a universal rite of passage for middle and/or high school students. At some point during a biology unit, nearly every student is asked to build a model showing the parts of a cell. It’s one of those classic science assignments that shows up year after year in classrooms and homeschool science curricula.

Even if your science curriculum doesn’t assign a cell model project, you should consider doing one anyway. Kids almost always retain information better when they can see and touch what they’re learning. Hands-on projects make abstract concepts feel real, and building a model of a cell helps students visualize how all the parts work together. Hands-on activities can include something as simple as a coloring page. (Yes, older students still like to color even if they won’t admit it.) And honestly, if you use a coloring book like this, even adults appreciate coloring it.
Another reason I love projects like this is that too many kids think science is boring. Boring? Science? Science is one of the most hands-on, curiosity-filled subjects there is. If kids think science or history is dull, sometimes it’s not the subject that needs help… it’s the way it’s being presented.
Sure, some kids will insist anything related to school is boring, but when they’re measuring ingredients, decorating a cake, and turning candy into cell organelles, suddenly biology feels a lot more interesting.
And, if you’re a homeschooling parent who hates science…well, we might just have to work on showing you how to enjoy it, too.
Why Make an Edible Cell Model With Cake and Candy
Now, there are plenty of awesome ways to make a cell model. Our particular science book included instructions for a Plaster of Paris model and I’d done a Styrofoam one years earlier with my oldest. But, I’ll let you in on a little secret – I’m somewhat opposed to projects I have to store and very much in favor of those we can eat!
Soooo… we opted to make our model out of cake instead! The project was so much fun! It looked amazing and it tasted delicious. Much better than the Plaster of Paris cell would have tasted. And, no storage required! (Unless you count the part that I stored on my hips, but that’s just rude.)
Plus, after taking lots of photos, we took our cake to an extended family dinner. The kids got a great review of the parts of a cell when the relatives asked about the cake, and I provided dessert without any extra work. Seriously, I can’t oversell this project!
This project turned out to be one of the most fun science activities we’ve done. The cake looked amazing, the kids loved decorating it, and it tasted delicious. Definitely better than a Plaster of Paris cell would have tasted.
How to Make an Edible Cell Model Cake
I scoured the web for inspiration and found a great plant cell cake and an animal cell cake. We used the animal cell directions as our main source of inspiration.
How to Make an Edible Cell Model
Equipment
- Round cake pans like these
- Silicon cup cake molds. I used these.
- Round Toothpicks. Any will do, we used these.
- Labels for labeling the organelles. We used these.
Materials
Ingredients for an Edible Cell Model
- Cake mix (and the ingredients to make it.)
- Vanilla icing
- Food coloring
- Various candies to represent organelles
Suggested Candy for an Edible Cell Model
- Blue Mike and Ikes = mitochondria
- Pink Mike and Ikes = smooth endoplasmic reticulum
- Air Head Bites = vacuoles
- Air Heads Xtremes = rough endoplasmic reticulum
- Sour gummy worms = Golgi apparatus
- Candy disc sprinkles = ribosomes
- Cupcake = nucleus
Instructions
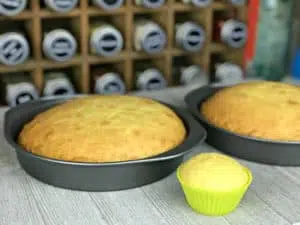
Step 1
- Bake the cake mix according to package directions. We used round cake pans since we were doing an animal cell model. We also used a little of the batter to make one cupcake to represent the nucleus. Allow the cakes to cool completely, then, assemble as normal with some of the icing between the two layers.

STEP 2
- Use food coloring to tint the icing so that you have one color to represent the cytoplasm, a second to represent the cell membrane, and a third to represent the nucleus.
- Pro Tip: Start with white frosting and use colors that mix easily to form new colors. That way, you don't have to divide icing and guesstimate how much you'll need for each cell part.
- Add a few drops of food coloring to the vanilla frosting and mix well to create the cytoplasm. Frost only the top of the cake.
- Next, add a few drops of food coloring (using a different color) to tint the icing a different shade (green pictured). Frost only the sides of the cake with the second color. This color represents the cell membrane.
- Finally, add a few more drops of food coloring to the remaining icing to create a third color to represent the nucleus. We chose to add red, which created a rather unappetizing color. Just something to think about.
- Cut the top off the cupcake. Place it on the top of the cake to represent the nucleus and frost it with the third color.
- You can discard the bottom of the cupcake if you choose. However, I recommend that you put a little leftover icing on it and eat it while your kids aren’t looking!
STEP 3
- Place the candies on the cake to represent the cell’s organelles. As we placed each candy on the cake, we reviewed the job of the organelles.(See the quick reference sheet below.)
STEP 4
- Use the toothpicks and labels to make flags. Write the name of each organelle on individual labels. Either fold the labels over around a toothpick so that the front sticks to the back or use a second label, placing it back to back with the first.
- As your kids add the labels to correctly identify each of the organelle, review the organelle and its job again.
STEP 5
- Take lots of pictures…then, eat your yummy cell cake!
Notes
Other Great Ways to Learn About Cells
Understanding cells and how they function is a basic building block of biology, but some of the terminology can be confusing or hard for your students to remember. That’s why I love this animal cell printable pack and this plant cell printable pack. I’d also suggest checking out this animal cell interactive notebook for kiddos in grade 4-7.

Also, check your local library or Amazon for books about cells, such as Looking Inside Cells. Don’t discount simple books that may be below your student’s grade level. Non-fiction books geared toward young children can be a fantastic resource of information that has been stripped to the basics making it easy to understand and remember.
Have fun learning together!
Did you enjoy making this edible cell model? Please pin, tweet, or share on Facebook! Be sure to tag us so we can see your creation!
You Might Also Like
10 Awesome Ways to Make a Cell Model
Oh, we are SO doing this! My kids will do any science activity that you can eat!
Awesome! We’ve done book projects that are edible too. I’m with you on the storing issue…
We were supposed to be making the plaster of paris model last week but had so many unexpected things crops up that we skipped it. I was going to find a worksheet instead but this looks much more fun – not to mention tastier!
Ok, I like the cake idea. I’ve seen pizza and gelatin, but this seems doable!
My kids are going to LOVE this.
I love the idea
I love it !!!!!!!!!!!!!!!!!!!!!!!!
I’m doing this for a science project in science at school! These ideas are awesome! Thanks you! This is going to help me a lot!
So am I
I am also doing this for a project a school. I does not seem hard and it does not take that long. Not to mention, I love to eat!!!
I’m also doing a 3D cell model this is what I want to do
A+ here I come
So am I, I’m soooo getting an A.
Thank-you Kris
I’m doing this for my cell model project for highschool biology and I was wondering how you did the labels because nothing is working for me!!
We wrote the organelle name on one label, then, stuck it back-to-back with a second label with the toothpick in between. Hope that helps!
Thanks this will help me in science
Thanks this will help me in science
Also this will help me through 7th grade science
We Are Doing This Right Now As I Type.
My daughter is in the 7th grade and we just finished purchasing the supplies. We will be making this tomorrow. Thanks for the great idea.
I am doing this for my 7th grade science project. Thank you for the amazing idea!
I did it for a school projet
i was in a jam for my science extra credit this is perfect
IM DOING THIS FOR MY PROJEST AND IT IS GONNA BE AWESOME!!!!!!!!! I LOVE FOOD
this is pefect for my project
do we have to do the colors just like you have them in the steps?
No, you don’t.
Thank you for the inspiring idea! My daughter and I had so much fun making this project together for her science class. I appreciate you taking the time to share it with all of us.
Thanks, Linda! I’m so glad you enjoyed it!
do we leave it in the fridge
We didn’t. I’d say just to store it the same way you normally store a regular cake. Hope that helps!
This is great!!! I can’t wait to do this!!! Thanks for the info
OMG. This is the best cell project ever. At least I don’t have to worry about not getting an A+ 🙂
I sincerely appreciate all the homeschooling moms that share information as you have. Public school has gotten so horrible. I’d love to homeschool but honestly…I’m too afraid that I don’t know enough/remember enough for my children (9th grade girl & 2 6th grade boys) to be able to help them properly.
Again, thank you for sharing, my boys will be doing this for their project – 1 animal cell and 1 plant cell.
Thankfully, you don’t have to know/remember it all. That’s what the teacher’s manuals are for. 🙂 I have really enjoyed learning and relearning a lot of things alongside my kids, too. Have fun with the cell cake!
how would make this into a 3-D model?
You’d probably need to do something like this: https://cakecrumbs.me/2013/05/24/commission-earth-structural-layer-cake/
But that’s way beyond my area of expertise. Good luck!
Hi, I’m making the cell cake, and following your recipe, I was wondering if you had a picture of the whole cake when it was finished. And maybe could post that. I need to finish the cake before tomorrow.
Thanks!
I’m sorry, but the only photos I have are included in the post.
Well thanks anyway! Great recipe! Homeschoolers rock????????????????
We live and homeschool on a sailboat, so I don’t like doing many projects that need to be stored either. This is great. This week we are making cookies three ways to learn about different types of rocks. My son is only kinder age, so I’ll modify this cell cake a bit, but we’re going to do it. Thanks for sharing.
I love this. My daughter and I made one of these for our home school group a few years back. I found it to be so cool — educational and edible!
best idea ever
I’m ALSO doing this for a project at school. I’m so excited!!!
love it
Does any one know if that is all 13 pieces of the cell because I love this idea but if there is not all 13, then i cant do it and I would get really mad and I really want to do this for my 7th grade cell project. Thank you so much! :}
Hi Skyla! All you need to do is use your creativity! 🙂 If there’s a part of a cell that isn’t already listed, just choose whatever kind of candy you think best represents that part and add it to your edible cell model.
I need to do thissssss love it! I have to do a cell project for school (I’m homeschool) SO EXCITED
Yay! I’m so glad you’re excited about doing your edible cell project!
I’m doing mine like this some of the candy is changed but ya mine I have to finsh dec 13 2021