

How to Make a Salt Dough Map (In 7 Easy Steps!)

* This post may contain affiliate links or sponsored content. *
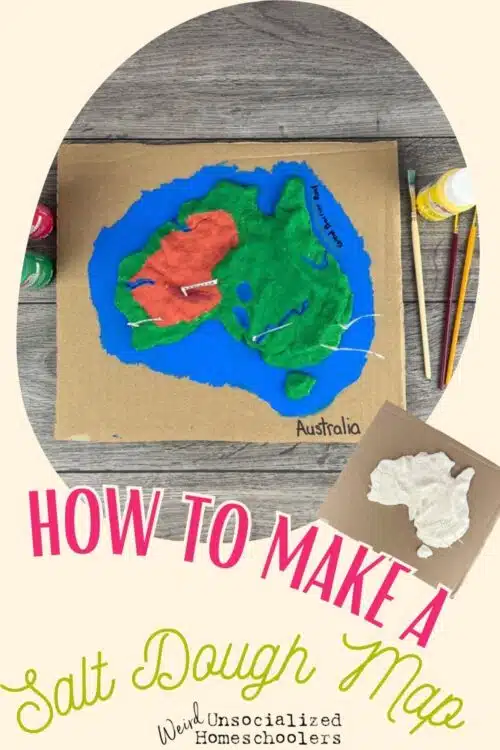

Easy and fun to make, salt dough maps are a great visual aid for learning the geography of a country and a fun, hands-on tool for making history come alive.
Why Make a Salt Dough Map
We’re very much the hands-on learner types at my house. Anything that lets us build, create, or bake (or play educational games!) captures our attention and helps us retain what we’re learning. And, there’s really no better hands-on project for learning about places than a salt dough map. (Except maybe food. Food is always a highly recommended learning activity.)
Creating their own three-dimensional map helps students visualize places and events in ways no other project does. I still remember way back in our early days of homeschooling when we were learning about Ancient Egypt. Lower Egypt and Upper Egypt made no sense on a flat map. Why on earth was Lower Egypt at the top of the map? Because those designations reflect the flow of the Nile, that’s why!
Salt dough is a great medium because it’s inexpensive and easy to make, simple to work with, and very sturdy once it’s dried.
Salt dough paints very well, too. Depending on how long you bake your completed map, you may need to use two coats of paint. We found that a softer dough absorbs more paint. We allowed the map for this article to air dry for two or three days, then baked it for about 20 minutes. It only needed one coat of paint.

Because it’s very much like molding with Play-Doh or clay, kids of all ages can easily make a salt dough map. Younger kids may need a little help with the finer details, but this project is a suitable hands-on project for middle and high school students, as well. They can add more detail than a younger student and create a very sophisticated project for their history or geography lessons.
How to Make a Salt Dough Map
You’ll need a cardboard base for your salt dough map. Any sturdy piece of cardboard will do, but we really like to make our maps on pizza boxes. These boxes are sturdy, easily accessible (most pizza places are happy to give you one if you just ask), and the perfect size. Plus the lid keeps your creation safe while it dries and the box makes it easy to transport.

How to Make a Salt Dough Map
Materials
- Flour
- Salt
- Water
- Blank outline map of the country or state of your choice
- Sturdy piece of cardboard or pizza box
- Pencil
- Sharpie marker
- Tape
- Paint
Instructions
Step 1
- Print your map. I usually just search “free printable outline map of {insert country or state name.}”

- Printing on regular letter paper works fine, but sometimes it’s helpful to print a larger size, such as 11x17, so that it’s easier to capture more detail on your map. You can usually get these sizes printed at an office supply store if you don’t have the equipment to do so at home.

Step 2
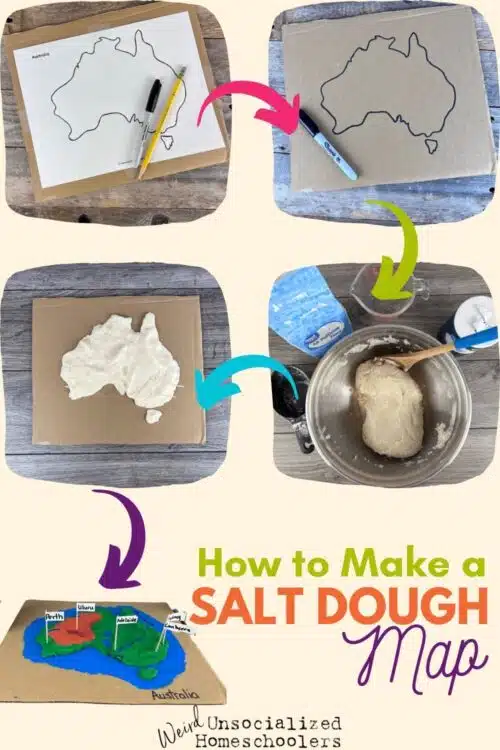
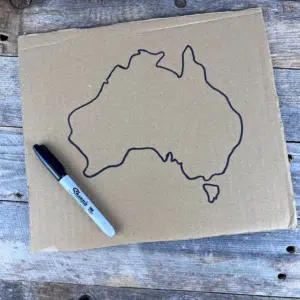
- Transfer the outline map to your piece of cardboard. First, lightly tape the outline map to your box. Then, trace the map in pencil, bearing down hard enough to make an impression of the outline on your box.
- You might want to heavily shade the entire back of your map with a lead pencil before taping it to the box. Sometimes this makes it easier to see the transferred lines once you remove the map.
- Gently lift one side to make sure you can see all of your transferred lines before removing the taped map.
Step 3
- Remove the map to reveal the transferred outline. Trace over the outline with a Sharpie marker.
- At this point, you can lightly spray paint the cardboard if you’d like. Use blue to depict water and tan or green to indicate land. As long as you don't paint heavily, the outline will still be visible.
- Alternately, your kids may opt to paint around their country or state once the salt dough portion is completed.
Step 4
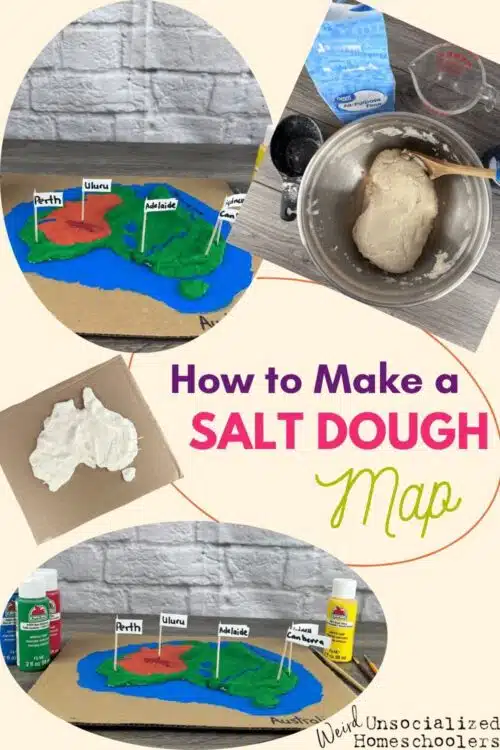
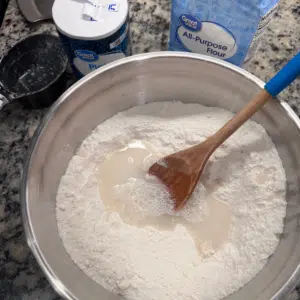
- Prepare the salt dough. In a large bowl, mix equal parts flour and salt together to make the salt dough. You’ll probably want two to four cups of dough, depending on the size of your map.
- Tip: One 26 ounce box of salt contains about two cups.
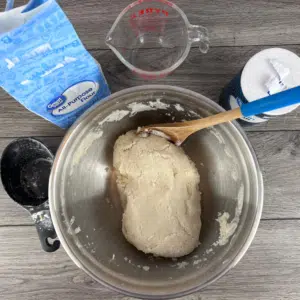
- Mix in just enough water to create a dough that is a Play-doh-like consistency. While the dough may be slightly sticky, you don’t want the dough to be wet. Because of the salt, the perfect consistency won’t be sticky like plain flour dough. Instead, it should leave more of a gritty feel on your hands rather than a sticky dough.
Step 5
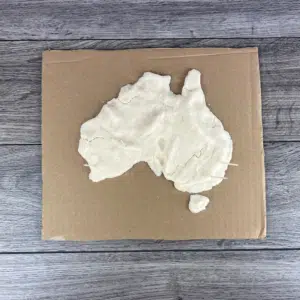
- Place the dough on your cardboard base and shape it into the outline. We found it helpful to push the dough slightly past the outline, then gently push it back with a fingertip. This helped achieve more detailed edges.
- After you’ve filled in the outline map, you can add more dough to build up areas to depict mountains and valleys, using a topographical map as a guide. You may also want to use your fingers to indent areas showing lakes or a toothpick to trace out rivers.
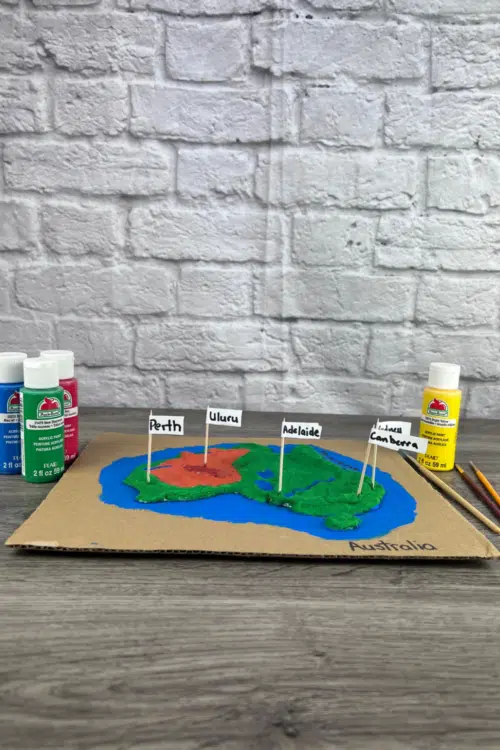
- You can also insert toothpicks or straight pins with the ball tops into areas showing the country or state’s capital, large cities, states or territories, and landmarks. After the dough dries, you can add labels to the toothpick (or pin) flags.
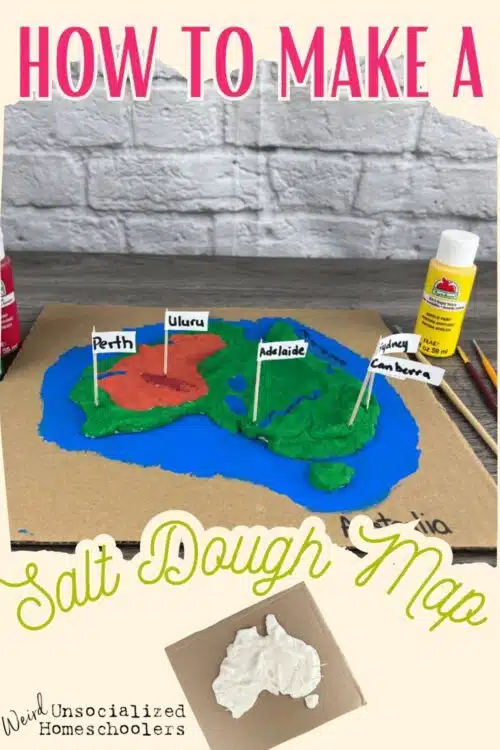
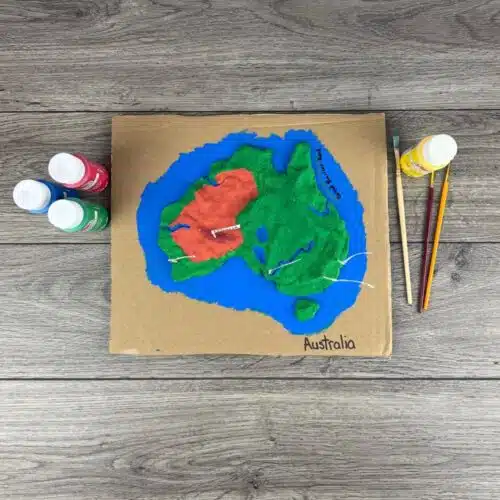
- While most of your map should be basically to scale, having traced a printed map as your guide, it's fun to add not-so-scaled highlights. For example, Brianna added The Leaning Tower of Pisa to our map of Italy and Mt. Fuji to Japan in years past. And I suspect that Uluru is not quite to scale in this map of Australia.
Step 6
- Let your map dry. You can either leave it in the sun for several hours or place it in the oven at 200 degrees (F). If you use the oven, be sure to supervise carefully, especially if you’re baking a painted pizza box! The dough should become hard enough that it doesn’t "give" when you press on it.
Step 7
- Paint your map (we use tempera or acrylic paint). And complete your toothpick labels. We just used address label stickers. We cut them in half lengthwise so they weren’t so big in comparison to the map. (We probably could have cut the toothpicks down smaller, as well.) Then, we wrote the city or landmark name close to the right end of the label. Finally, we folded the label around the top of the toothpick, stuck it to the empty space we’d left on the left side, and cut off any excess.
- You can also use paint or a Sharpie marker to mark the country’s physical and political boundaries, states or territories, landmarks or any other features relevant to your studies that you didn’t label with pins. (Or instead of using pins altogether.)

How to Use a Salt Dough Map
That’s it! You now have a wonderful tool for studying your country of choice and a really awesome keepsake of your studies.
Leave your map out while you’re reading out the country or doing your history lesson. You can stop periodically and discuss how the country’s geography and other physical attributes have affected its history and the development of ancient civilizations or modern cities. If you’ve got younger kids, check out these fantastic projects for learning about topographical maps and introducing them to maps and globes.
We’ve also used our maps as part of our homeschool group’s annual spring fair Around the World Day event in which each family chooses a country to represent. We’d bake some tasty treats for our country of choice and create some related artifacts to display (such as musical instruments or landmark replicas related to the country). Then, we’d design a fun stamp (usually something printed on printable address labels) to add to everyone’s homemade passport when they visited our table. It was such a fun way to get together and learn about other countries!
If you wound up with extra salt dough, consider letting your kids create miniature man-made landmarks associated with your country or state – maybe the Sydney Opera House for Australia, the Eiffel Tower for France, or the Statue of Liberty for New York. Or you could make replicas of the traditional currency or the state or country’s seal or other national emblems. The possibilities are limited only by your imagination. What other suggestions would you add?
Have you and your kids ever made a salt dough map? If so, which country or state? If not, what place will you create first?
You Might Also Like…
- How to Make an Edible Cell Model
- 5 Creative Ways to Teach Homeschool Math (That Aren’t Curriculum!)
- Hands-on Language Arts for High School Homeschool
Kris Bales is a newly-retired homeschool mom and the quirky, Christ-following, painfully honest founder (and former owner) of Weird, Unsocialized Homeschoolers. She has a pretty serious addiction to sweet tea and Words with Friends. Kris and her husband of over 30 years are parents to three amazing homeschool grads. They share their home with three dogs, two cats, a ball python, a bearded dragon, and seven birds.
I absolutely love the dough maps!!! We are actually studying Japan and always label a blank map, but I will do this from now on. We can do this on Fridays (our art day!) Thanks so much for the ideas I get from your blog!
Happy Homeschooling!
Kim from Tampa
Thank you! I am going to do this with the boys maybe of Great Britain or Rome… or both!
Thanks for posting this.. there maybe a lot of salt dough maps at ATWD this year! I think they really add to the display.
Hi! I’m not sure how I found your blog (I think you might be on one of my friend’s blogroll lists – I was blog hopping a lot yesterday LOL) but I wanted to say hello and that this is a fantastic post! I’ve heard of salt dough maps, and have done other salt dough things, but never tried the maps… Definitely something that my kids would enjoy! 🙂 …Thanks so much for the step-by-step instructions and the photos!
Ps – love the name of your blog *grin*
Great idea! Thank you so much for the photos and the steb-by-step instructions!
I am using Galloping the Globe this year with my almost 7 yr. old-I know he’ll LOVE making salt dough maps instead of just using good old tracing paper. 🙂
Okay, this idea is fantastic! We’re using Tapestry of Grace and I couldn’t figure out what to use to create our salt maps on. Plus, I knew my packrat self would want to keep my kids creations……….pizza boxes are stackably perfect!
You are totally NOT weird! You all are wonderful. I too use Tapestry of Grace for History, and this is the best illustration of salt dough map making that I’ve ever seen! I love the pizza box idea too. Thanks for taking the time to show your fellow weirdos! We will use it this week for the Middle East!
Becky Wake Forest, NC
Thank you so much, Becky. What a wonderful compliment.
Thanks so much for these instructions! I just googled “salt maps” because my son has one due for school on Friday and we have no idea what to do! Now we know!
Husband running out for salt as I type!
Thanks a bunch!
Thanks so much! Mine were so fun to make with my kids!
Thank you! We just made a map of the 13 colonies, using toothpicks with little name flags to mark each colony. My daughter loved this activity and I know we will do it again! Great idea!
Thank you for this helpful information. I am 38 years old and never had to make a relief map before. I almost had a panic attack when my daughter told me she had to make one! Thanks again and have a blessed day!
Tammy Davidson
So glad you posted about this on your new post today because I have looked around and finally found a recipe that I could use!!! We are going to be making our favorite Geographic feature that we have learned in our study so far!!!
got any ones for vietnam need to do it for a school project?
You can use these directions to make any state, country, or continent. Just use the map for the place you need when drawing your outline.
Great idea, My nephew used this to do a island project,It was easy and fun. thank you
Thanks for the easy to follow instructions. My son needed to make a map for a school project (we’re not homeschoolers) and this was perfect. All the best.
I’m glad the tutorial was helpful!
How long can you keep salt dough maps after they have dried? Thanks!
I recently threw away one that was several years old. It was kind of cracked and pitiful looking by the time I threw it away, but it took it awhile to get that way.
Hi. Great instructions. I made a few salt maps when I was a kid for school projects. I searched for the recipe since it has been years since I did this. I am planning to use this in an art class that I teach. However, wanted to suggest food coloring for colors in the maps. That is what we use to do. Food coloring comes out some what pastel, but works well and is less messy than paint. Thanks for a great tutorial!
I originally used salt maps when I home educated my four children almost thirty years ago. They loved them and remembered so many more of the geographical features of the area we were studying after we shaped, painted, and labeled them all on our maps. I’m just now getting ready make a map of our state with my grand daughter who is being home schooled as well.
Thank you for helping my inspiration today!! I did note that between steps 2 and 3 that you’ll need to cut the patterned paper. We just used watercolors to paint the oceans…and voila’ our US map of 1804 and Lewis and Clark journeys are fini’. Ever Grateful!!
does it work with food coloring?
I’ve never tried it with food coloring. We’ve always just painted it after baking.
I would really like to create the salt dough maps for a classroom project. My only problem is since I teach middle school, I will have too many maps to take home and bake. I wanted to know if you think putting them on a shelf next to a window will be fine or would that take too much time for it to dry? Also in order to layer up the map to create mountains does it still need to be wet? Please let me know I want to start this project 2 weeks into school starting in August.
Hi, Nicole. I’ve never done the salt dough maps without baking, but I would imagine that would work. I’m just not sure how long they would take to dry completely. I would think that it would work to add wet layers to dry and build up as you go. Again, I haven’t done it that way, so I’m not sure. Your best bet would be to try it before doing it with your class to get a better idea of the time needed and make sure you don’t run into any problems. I hope that helps.
What suggestions might you have for labeling?